Posts Tagged 'Terrain'

Airbrush Lessons and Terrain Painting

Multiple Golden Demon-winning painter and good friend Sam and his brother John came over on Saturday to show me some airbrushing tricks and best practices. I learned tricks on cleaning my airbrush, how to properly mix color and how to apply and blend that color on the model you’re painting. I learned a lot and put some of it into practice before Sam left. I’m really looking forward to trying it out on some figures soon (probably USCR guys from MERCS) and another Chaos Rhino or two and some terrain, of course. So, so much terrain.

Sam working on a Blood Angels Land Raider (for my friend Eric) while explaining the finer points of airbrushing

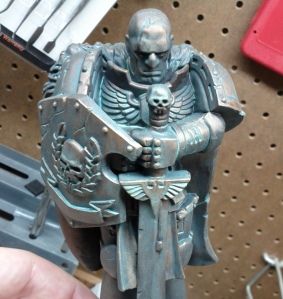
However, between coats of color on the Land Raider he was painting to show me examples, we stalked about the Nerd Bunker to find something for me to practice airbrushing. I usually have a bunch of primed or half finished projects lying around. One thing we did find (but decided not to airbrush) was a statue from the Honoured Imperium terrain set from Games Workshop. After looking it over and discussing how to best paint it, I got to it.

A work in progress, but it's looking good so far

It’s turned out pretty well so far, especially the green patina effect on the bronze statue. I need to paint the base of the statue to look like stone, and then do a few touch ups with a wash in some of the darker areas, but then it’ll be done. Maybe, if I ever get a second one of those statues, I’ll do a step by step tutorial about it if people are interested. Also, I’ll make sure to take fancy photos of this project when it’s all done.

My Modular Urban Terrain Project

I got an idea last year about making some modular urban terrain to play with. I thought about it for a long time and made a bunch of sketches and notes. Eventually, these turned into some computer drawings and a list of components. One of the first things I needed was a four foot square mat to represent the streets. I looked around online and settled on a mat from The Terrain Guy made of canvas, textured and covered in rubber. This is a great handmade mat for a good value, in my opinion. This will be the streets of my urban board.

I decided that MDF would make up the ‘blocks’ of my urban landscape. Once I decided on all of the sizes and shapes in my configuration, I had to get some MDF and a friend with a table saw.

A simple grid map

After a lot of sawing, I had a stack of squares and rectangles and whatnot, and then it was time for the sanding and the dremeling, which is probably not a real word. The general idea was to round the edges of the pieces and use them as curbs and sidewalks.

A simple example layout with a few buildings for scale

This will allow for a board with many different configurations. Between the different ‘blocks’ and the ability to put different buildings and other terrain pieces on those blocks, I should have hundreds of variations for my gaming table.

However, I now need to texture and paint all of the ‘block’ pieces. I’ll be using sand and kitty litter with wood glue to do the texturing, and then I’ll be painting the pieces with black latex paint. After that dries, I’ll be spraying them grey and doing a little drybrushing.

We seem to be under attack

So the plan is to document the further work on the modular urban project. I doubt I’ll be able to get much done this weekend, as it is currently very humid around here. Hopefully that’ll be cleared up by the end of the weekend so I can do a little painting outside on Sunday morning. I’ll keep you informed here.

Excuses and Resolutions

So we’ll start with the excuses: you may notice that my last post was way back in September. This is ridiculous, and should get me thrown in jail. Luckily, our legal system doesn’t work that way, so I’m out, free as a bird and able to commit other crimes in the future like jaywalking and aggravated buggery.

An OshCon 2009 "action" shot

However, I do have reasons for my silence, however weak they may be: in early October, I ran OshCon 2009: a gaming convention here in Oshkosh, WI. This year was our biggest yet, with 233 attendees over the two days. Hey look, pictures! Obviously, a gaming convention doesn’t prepare for itself, so I was very busily crossing “i”s and dotting “t”s for weeks beforehand, including the date of my last post to this blog, meaning I did actually take time out of my busy preparations to give you a lame and phoned-in post. You’re welcome.

After OshCon, I attended RockCon in northern Illinois. That was really fun and I met some really cool people and found out that my hotel room didn’t give me a disease, so it was really win-win. I did accidentally (nearly) kill a guy, so it wasn’t all roses.

Then, let’s say work was pretty busy. Sure.

Then it was Thanksgiving, then St. Nick’s Day, then probably Presidents Day or something, then I started a tabletop miniatures gaming and hobby group, then built a web site and forum for said group, then Christmas. Everything is just a blur, frankly. Eventually, I found myself on the 2010 side of New Year’s, and now here we are. I did do a bunch of stuff during the time that this blog was dark, but I will post those things later, and make it look like new content. Aren’t you lucky?

Speaking of New Year’s, now is the time when I talk about my New Year’s resolutions. This year, I’m going to aim for an hour of painting and modeling per day. You read that correctly. Now, if I can’t paint on a Tuesday due to other commitments or something, then I just need to paint for two hours on Wednesday, and so on. Certainly, this may cause me to have to do a lot of catching up on weekends, but what the hell are weekends for, I might ask? Exactly. So an hour a day is the goal.

Another resolution: I am going to paint more, and buy less. Actually, the plan is to not buy any minis and just paint all the primed minis on my shelves and the un-primed and un-constructed minis in my storage boxes, but something awesome might come up, and I’m not made of stone, for Pete’s sake. However, I am going to stop surfing eBay and picking up things I don’t need just because they’re cheap. Do you know how many Necrons I ended up with doing that? A gaggle. A gaggle of Necrons. Or perhaps it’s a drudge.

I’m also resolving to get more terrain finished. I have half a dozen unfinished projects on and around my desk, and I have a brand spanking new Realm of Battle board sitting in my closet, waiting to be primed and painted. I really have to wait until spring and warmer weather to tackle that project, but I can work on several other terrain projects in the mean time, and I mean to.

Here come the Warjacks

Lastly, I resolve to play more. I have so many games, and I’m interested in many more. I’ve started a miniatures gaming club, so there should be plenty of opportunities to play. I’ve been playing Star Wars Miniatures most Tuesdays at the House of Heroes, but I really want to play more Warmachine (probably staying with the old Prime Remix rules instead of moving to the new Mk II rules) and AT-43 and Song of Blades and Heroes and Mutants and Death Ray Guns. Plus, there should be more playtesting of the rules that Peter and I are working on. Oh yeah, and I bought a copy of the new release of Space Hulk when it came out, so there’s that as well.

Anyway, enough rambling, I need to catch up on my painting for the week. It is a Saturday, after all.

I Am a Bad Man

I know, I’ve been mainly absent from updating this blog lately, but it’s not because I’ve not been gaming and doing game-related activities. I’ve actually been doing a lot of them, including work on the upcoming OshCon 2009 tabletop gaming convention on October 10-11, a Half-Day Game Day at House of Heroes a few weeks back, and working on starting a new miniatures wargaming club here in the area. I’ve also being painting zombies and RoboRally miniatures for an event at OshCon, I’ve been working on my modular urban terrain system, and I received my copy of the new Space Hulk, and those terminators and genestealers aren’t gonna put themselves together, no matter how much I wish they would. So I’ve been doing stuff.

Anyway, I’ll post some images of my urban terrain system in its starting phases this weekend, I believe. Plus, I have another terrain project that I need to get finished for OshCon, so I have photos of that process soon enough. Stay tuned.

Long Time No See

Or at least, a lot longer than I would have liked. Work was mainly to blame, as it is every year at this time. The company I work for hosts a big event (convention, trade show and more), and by big, I mean officially seven days long (but in actuality it’s much longer) and 578,000 people this year. For me it meant 10+ hour days for 21 days straight, so I wasn’t much in the mood to do much painting or terrain work. I barely even played any games. After the event finally ended, I did start working on cleaning and organizing my work area at home, and that has finally spurred me to get back to work. Well, that and reading all the coverage of this year’s Gen Con that I was missing (grrrrrrr).

Tau Stealth Suits and a new(ish) piece of terrain

Tau Stealth Suits and a new(ish) piece of terrain

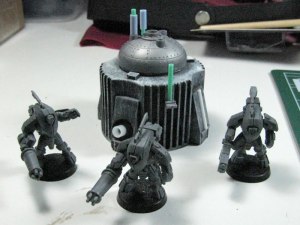
Here’s some Tau Stealth Suit figures I built from Warhammer 40,000 (Games Workshop). As I have mentioned in the past, I don’t play that game, but they make the best darn figs in the industry in my opinion, so picked these up at last year’s Gen Con. I still need to add some basing to them (I think I’m going to use the tiny foam bricks I’ve been punching out) and then they need to be primed and painted. I’m going to use them in the new miniatures game that Peter and I are working on, so I might actually buy another box of three just so I can have a squad of six of them.

That odd looking thing behind the Stealth Suits is a piece of terrain that I got a few years back at Gen Con that I’ve recently started sprucing up. I’m adding some pieces from the Hexagon Chemical Plant set and some small plastic tubing and other greeblies. It’ll be some sort of holding tank or mini-reactor when it’s done.

Blue electrical box soon to be a LOS blocker

Blue electrical box soon to be a LOS blocker

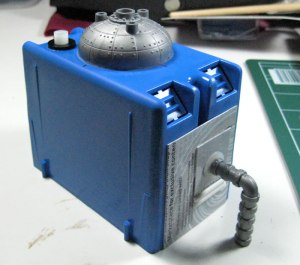
Lastly is this other terrain piece that I’ve been working on. It’s a blue plastic electrical box available at pretty much any hardware store. I used my Dremel tool to grind off some of the sticky-outie bits and have been adding more bits from the Hexagon kits to it. It’ll be a power transformer or a substation or who knows what when it’s painted and done. The Hexagon kits are really helpful to the DIY terrain creator. They’re great plastic kits that can be used by themselves, but I think they work better as add-ons to your home made projects. I’ll have to try and do a write up of the kits soon.

Some Old Terrain

Skeleton Rock

Skeleton Rock

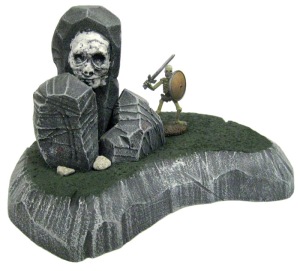
Here’s some terrain I built three or four years ago. I keep it (and the little skellie from Reaper Miniatures that I painted at a Paint ‘n Take at last year’s OshCon) on top of my big four-drawer filing cabinet in my office at work. The skellie stands there and protects the filing cabinet and his rock from all attackers. People come into my office, look at the bony soldier and not-actually-made-of-rock dias, and usually move the both of them over so they can lean on the filing cabinet while they yammer at me (except for Dave, who doesn’t yammer). The poor unholy warrior just stands there, his sword raised in impotent rage.

The piece is mostly all made out of that pink house insulation foam that you see nailed to the outside of houses as they’re building them or putting on new siding. The skull on the rock totem is actually an old plastic Halloween skull ring. There’s also some model railroad talus (small rocks) and some green foam fake shrubbery (on the backside of the rock totems, out of the camera shot).

The main platform was cut with a Wonder Cutter, which is a hot wire foam cutter. It works great, but leaves the edges with a kind of tell-tale signature ‘look’. People who make terrain can tell you cut it with a hot wire foam cutter and then didn’t try to finish the edges to make it look like stone or anything.

The three totems where cut from the foam with an extendable utility knife. I used the tip of the knife to make the striations on the faces of the totems. They actually turned out rather well; maybe I’ll make a mini-tutorial about how to do that some day.

I then painted it all with tempera paints. For the grass area, I added in some painter’s texture, because I hate flock like poison. I can never get it to stick right and it gets all over everything. For the stone areas, it was a dark grey, then a drybrushing of lighter grey, then a drybrushing of white.

What would I do differently? I would finish the edges of the platform. I’d either sand it smooth and paint the edges green like the grass to make into more of a mound or I’d cover the edges with spackle or I’d just chip away at it with a knife… anything to get rid of that hot wire foam cutter look.

I’d also add more detail to the ground. I’d glue kitty litter to the area around the totems and I’d actually paint the talus rocks, instead of just glueing them down and letting them be their own color. I’d also drybrush the grass to give it more visual interest.

I’m planning on making a new version of this terrain piece, using the new techniques that I’ve learned in the last three or four years. When I do, I’ll have to post comparison shots to see if I’ve gotten any better.


atom smashing

A gaming blog talking about miniatures games, miniatures painting and collecting, game design and other nerdly delights.


The Statistics – 2013

Minis games played:
• WH40k (1850 pts):
   BT/GK vs Kevin (Eldar/DE) LOST
• WH40k (1500 pts):
   BT vs Jason (D.E.) LOST
• WH40k (1500 pts):
   BT vs Kevin (S.W.) LOST
Minis finished:
 none yet
Terrain finished:
 none yet
Cons attended:
 Fire & Ice
updated 28FEB2013

Enter your email address below and receive notifications of new posts in your inbox.

Join 16 other subscribers